Fresh Sourdough Sandwich Bread (Same Day Recipe or Overnight)
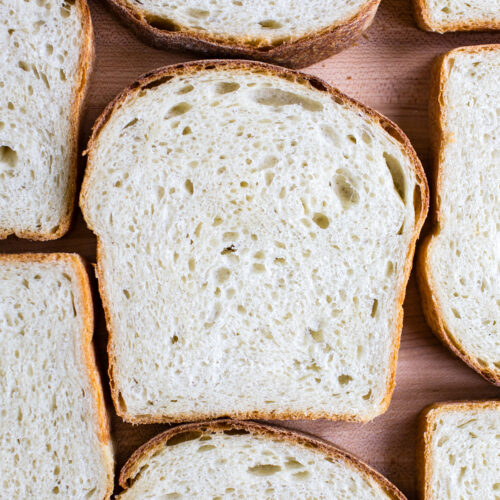
**Advanced Prep Required - you'll need a Sourdough Starter**Fresh and irresistible, my Soft Sourdough Sandwich Bread recipe features fluffy sourdough starter, olive oil for softness and a touch of earthy maple syrup for interest and golden color. This bread is soft yet sturdy enough for sandwiches and toast. You can make it the same day or overnight. A Note on HYDRATION - Flours vary in their moisture content from brand to brand. Additionally, local humidity conditions will impact how your dough feels from one batch to another. Even if you weigh your ingredients (which I recommend), this is not uncommon. As you gain experience in making sourdough, you'll gain a better understanding of how your dough should look and feel. Time above is for same day method. It does not include time for the overnight method: for fermentation, shaping and proofing which takes between 12-13 hours (overnight). Use the times as a guide, not as a determining factor._______________________Bakers Schedules: Overnight: Friday-Saturday: feed starter. Saturday night: mix dough and ferment overnight. Sunday morning: shape dough, allow to rise (proof), bake.Same Day: Friday: feed starter. Saturday morning: mix the dough and ferment. Saturday afternoon: shape dough, allow to rise (proof), bake. ________________________Serving size depends on how thick or thin the loaf is sliced. I can get about 12 thick slices or 15-16 thinner slices out of this loaf.
Recipe by Traci York on May 16, 2025
Prep time: PT15M
Cook time: PT35M
Total time: PT420M
Rating
4.96 stars (24 reviews)
Keywords
Sourdough Sandwich Bread
Ingredients
3/4 cup (150 grams) Sourdough Starter (100% hydration, previously fed, bubbly and active)
1 cup (225 grams) Water (about 80F (26C))
2 tablespoons (40 grams) Pure Maple Syrup
3 tablespoons (40 grams) Extra Virgin Olive Oil
3 cups + 2 tablespoons (425 grams) Bread Flour
1 1/2 teaspoons (10 grams) Fine Sea Salt
Categories
Bread
Side
Cuisine
American
Steps
Mix the Dough: whisk the starter, water, maple syrup and olive oil together in a large bowl with a fork. Add the flour and salt. First, mix with a fork, the dough will be shaggy. Then mix by hand, mixing, folding and pushing the dough in the bowl until the flour is fully incorporated and no dry bits are present. The dough will feel sticky and soft and it will stick to your fingers as you go. Do this for about 2-3 minutes. Use the fork to scrape off the dough on your fingers. Cover bowl with a damp tea towel. Set a timer for 30 minutes and allow the dough to rest. Now is a good time to feed/refresh your starter.
Fold the Dough: After the dough has rested, fold the dough. To do this, grab a portion of the dough while it remains in the bowl, stretch it up and fold it over, pressing your fingertips into the center of the dough. You'll notice the dough is soft and more pliable (less sticky) at this point. Repeat, until you've worked your way around the dough. This is the first fold. Cover bowl with a damp tea towel and set a timer for 30 minutes and allow the dough to rest. Perform one more fold, then continue into bulk fermentation.
Bulk Fermentation (first rise):Same Day: After the last fold, cover the bowl with two damp tea towels and allow to rise for three hours in a turned off oven with the light on (80-82 Fahrenheit (26-27 Celsius). When bulk fermentation is complete, the dough should rise between 20-30% in size. The dough will feel a little tacky, but it will be pliable and easy to work with at this point. You may see a few small shallow bubbles on the surface. It will not be jiggly. OROvernight: After the last fold, cover the bowl with two damp tea towels and allow to rise overnight at room temperature. This will take about 8-10 hours at 70F (21C), but in a cooler kitchen, the dough can take up to 10-12 hours to rise - this is the norm in my chilly kitchen 68F (18C). Use the time as a guide and not a determining factor. The dough is ready when it no longer looks dense, is jiggly when the bowl is shaken, has bubbles on the surface, and has about doubled in size.
Pre-Shape the Dough: with damp fingertips, coax the dough onto a floured work-surface. With moist fingers, take a portion of the dough, gently stretch it towards you and fold it over towards the center, pressing it down gently. Repeat this process until you work the dough all the way around the dough. Using a bench scraper flip the dough over, cover with a tea towel. Rest the dough for 15-20 minutes. While the dough rests, thoroughly coat the inside of a 9 inch x 5 inch (23cm X 12cm) loaf pan with olive oil. Set aside. Shape the Dough: Flour the work surface and using a bench scraper, flip the dough back over. Use the photos in the blog post to help guide shaping. Gently shape the dough into a rough rectangle by dimpling the dough (think focaccia), to roughly 6 inches wide and 8-10 inches long. Fold the dough letter style 2/3 over onto itself and crease it firmly using the pinky side of your hand. Fold the 1/3 piece left, over the crease and pinch the seam closed. Fold in the ends, coming in about a 3/4 inch - 1 inch each, and pinch the seams closed. Flip the bread over, rock it back and forth a bit, and gently fluff the ends in. Cover with a tea towel and allow the dough to rest for about 5-10 minutes. Scrape your work surface area of any excess flour and very lightly spritz it with water (this will help increase surface tension as you do the final shaping). Place the dough on the spritz of water (seam side down) and using lightly floured hands, cup the back of the dough and gently pull it towards you until the surface is taught. Gently fluff the ends in again if needed to fit into the loaf pan.Once the surface is taut and with one swift move, use the bench scraper to scoop the dough up and, place the dough into the prepared loaf pan seam side down. If there are misshapen edges or a wrinkled top that need tucking in, use a moistened rubber spatula to gently finesse and shape the edges of the dough down into the pan.
Proof the Dough (second rise): Cover the pan with a damp tea towel and allow the dough to rise until the dough has risen to about 1 1/4 inch (3.2 cm) above the lip of the pan at the center of the dough.Same Day Dough: Proof your dough in a turned off oven with the light on (80-82 Fahrenheit (26-27 Celsius). At this temperature, proofing takes about 1 1/2 - 2 hours. *Be sure to remove the pan from the oven before preheating the oven.*OROvernight Dough: Proof at room temperature. The amount of time this takes will vary depending on ambient temperature. At 70F (21C) proofing takes about an hour. In my chilly kitchen at 68F (20C), about an hour and 15 minutes.
Meanwhile, set an oven rack in the center of the oven and preheat to 425F (218C).
Bake: Place the loaf into the oven and then, reduce the oven temperature to 400F (204C). Bake for 30-40 minutes. The bread is ready when the internal temperature (read on a digital food thermometer) of the loaf is between 190F - 205F (87C - 96C). When done, transfer to a wire rack. Cool for 10 minutes in the pan, then transfer to a cooling rack. Cool 1 hour before slicing.
Storage Notes: Sourdough is best enjoyed on the same day it's baked, but it lasts for 3-4 days stored at room temperature. Store at room temperature cut side down on a cutting board. This bread freezes beautifully. Store baked bread in a freezer bag either whole or sliced for up to two weeks. Thaw at room temperature. This bread can go straight from freezer to toaster to make the most delicious toast!
Nutitrion
Serving Size: 1 loaf
Calories: 2143 kcal
Carbohydrates: 357 g
Protein: 55 g
Fat: 52 g
Saturated Fat: 7 g
Sodium: 3514 mg
Sugar: 19 g
Unsaturated Fat: 41 g
Reviews
Amy on 2026-10-02 (5 stars): The maple syrup is such a nice touch, I usually don’t brag about my own bread but this loaf is bragable! So soft and great flavor.
Sarah on 2026-09-28 (4 stars): This is the first sandwich bread recipe that I’ve tried that is actually soft and perfect for sandwiches or toast! I’m curious if you’ve ever used honey instead of maple syrup? Would you use the same amount?
Michelle Berger on 2026-09-20 (5 stars): Have you refrigerated after the overnight proof before baking?
Erin on 2026-09-07 (5 stars): I have been making this recipe and love it. Was wondering if I could add inclusions to it?
Tirzah Jankowski on 2026-09-01 (5 stars): Amazing and delicious bread!!! I make this every week! 🥰 game changer was buying a bread slicer!!
Beverly on 2026-08-22 (5 stars): WOW! This bread is amazing!
I, recently, started a sourdough starter for my husband and I to enjoy eating good wholesome food. My husband has a hard time chewing the sourdough bread, which is too hard for him to chew.
My trustee Pinterest came through for me once again! I had viewed several recipes and I decided on your recipe! The dough is soft and very delicious.
My husband is over the moon!
Greg on 2026-08-03 (5 stars): Been playing. Around with sourdough for quite a while, first sourdough, sandwich bread. loaf, I've made it is perfect. I am so proud of myself, so thank you. I did add a teaspoon of bread inprover.
Juliet on 2026-07-22 (5 stars): I love this recipe. I've made both versions and it turns out perfect.
One thing to note, if you put the light on and close the door of the oven, it's often much hotter than 82 degrees (mine was over 100). My dough was practically overflowing after the three hours. The bread still turned out wonderful. I'm going to try with the light on and the door open a bit next time.
Kristin on 2026-07-16 (5 stars): This is the softest, tastiest bread I’ve made thus far!