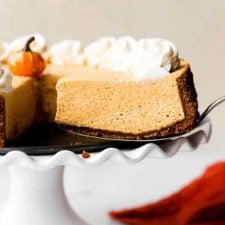
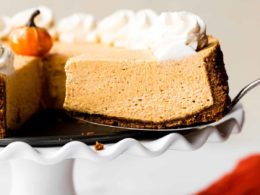
This fluffy no-bake pumpkin cheesecake sits in a crunchy gingersnap crust. The most important steps are whipping the heavy cream into stiff peaks before folding into the filling and refrigerating the cheesecake long enough so it can set.
Recipe by Sally on November 1, 2020
Prep time: PT20M
Total time: PT8H20M
Rating
4.7 stars ( reviews)
Keywords
no bake, cheesecake, pumpkin cheesecake
Ingredients
2 cups (200g) gingersnap cookie crumbs*
1/4 teaspoon each: ground ginger and ground cinnamon
6 Tablespoons (85g) unsalted butter, melted
1/4 cup (50g) granulated sugar or brown sugar (packed)
1 cup (240ml) cold heavy cream or heavy whipping cream
16 ounces (452g) full-fat brick cream cheese, softened to room temperature
1 cup (226g) pumpkin puree*
3/4 cup (90g) confectioners’ sugar
1/4 cup (50g) packed light or dark brown sugar
1 teaspoon pure vanilla extract
2 teaspoons store-bought or homemade pumpkin pie spice*
1/2 teaspoon ground cinnamon
1/8 teaspoon salt
Whipped Cream and/or Salted Caramel
Categories
Dessert
Cuisine
American
Steps
Stir the gingersnap crust ingredients together. Pour into a 9-inch or 10-inch springform pan and pack in very tightly. The tighter it’s packed, the less likely it will fall apart when cutting the cheesecake. I recommend using the bottom of a measuring cup to pack it into the bottom and up the sides. You can watch me do this in the video above. Freeze for 10-20 minutes as you prepare the filling.
Using a hand mixer or a stand mixer fitted with a whisk attachment, whip the cold heavy cream into stiff peaks on medium-high speed, about 4 minutes. Set aside.
Using a hand mixer or a stand mixer fitted with a whisk or paddle attachment, beat the cream cheese on medium speed until perfectly smooth and creamy. Scrape down the sides and up the bottom of the bowl with a silicone spatula as needed. Add the pumpkin, confectioners’ sugar, and brown sugar and beat on medium-high speed until combined. Scrape down the sides and up the bottom of the bowl as needed to help combine. Add the vanilla extract, pumpkin pie spice, cinnamon, and salt and beat until combined, creamy, and smooth. Make sure there are no large lumps of cream cheese. If there are lumps, keep beating until smooth.
Using your mixer on low speed or a silicone spatula, fold the whipped cream into the cheesecake filling until combined. This takes several turns of your silicone spatula. Combine slowly as you don’t want to deflate all the air in the whipped cream.
Remove crust from the freezer and spread filling into crust. Use an offset spatula to smooth down the top.
Cover tightly with plastic wrap or aluminum foil and refrigerate for at least 8 hours and up to 2 days. For best results, at least 12 hours is best. I chill mine overnight. The longer refrigerated, the nicer the no-bake cheesecake will set up. I don’t recommend using the freezer to set this cheesecake filling.
Use a knife to loosen the chilled cheesecake from the rim of the springform pan, then remove the rim. Using a clean sharp knife, cut into slices for serving. For neat slices, wipe the knife clean between each slice.
Serve cheesecake with optional toppings. I used Ateco 849 piping tip for the whipped cream in the pictured cheesecake. Cover and store leftover cheesecake in the refrigerator for up to 5 days.
Reviews
Barbara Stratton on 2025-11-11 (2 stars): I made this recipe using exact ingredients and watched video. However mine refused to set up! I refrigerated 2 days prior to serving and when I removed sides of pan it just drooped. It was more like mouse-nothing like picture. Tasted good but not pretty to serve. Will go back to baked cheesecakes
Ali Anor on 2025-11-20 (5 stars): I made this cheesecake many times, but the amount of whipped cream is sometimes off. It seems to be a heavy cream issue, not a recipe issue. I make my whipped cream first, and then transfer it to a bowl in the fridge to stay firm while I make the cream cheese pumpkin mix. Then I fold in just enough whipped cream to get that nice whipped look, and save the rest for topping.
I move the filled crust into the freezer for 15 minutes before transferring it to the fridge, and once set, pipe the extra cream on top.
If you use store bought whipped cream out of a tub, it falls flat and changes the consistency to a mousse, so don’t do that. I took one for the team for funsies and ate the mousse with graham crackers. Still a win.
Rachel Cannon on 2025-11-23 (4 stars): Really tasty and easy to make, but mine didn't set up after 20 hours in the fridge. I followed the instructions exactly (full fat cream cheese, stiff peaked whipped cream, gently folding things together), but it didn't work. I wound up freezing it and then thawing it right before serving. Still much easier than a baked cheesecake.
Made it with a pecan crust and added a salted caramel drizzle (made with the leftover cream in the pint).
Jodie Meadows on 2025-11-25 (5 stars): I’ve made this every year for the past 5 years and it is my FAVORITE! So simple, especially for someone who doesn’t bake often or very well lol but I try and this one always turns out so delicious!! A must try recipe!
S. on 2025-11-26 (5 stars): I used jars, maple in place of vanilla flavoring, and it came out perfectly. Delicious!
Will definitely make again.
Eileen K on 2025-12-01 (5 stars): Wow! I’ve made this 3 times in the last month. Guests are so impressed. Thank you Sally! I make mine 2 days ahead of time because the ginger snap crust flavor intensifies over time. It is tastier than the graham cracker crust imo. This will be a regular holiday dessert for us!
A. on 2025-12-02 (5 stars): Amazing! This and the Great Pumpkin Pie recipe were huge hits with my family. I used the graham cracker pie crust because I couldn’t find gingersnaps at my store, but next time I’ll plan better in advance. It was still delicious with the graham cracker crust and super easy to make for an amateur baker.